About my Git workflow
It has been a while since I posted an article, and even more since I posted an article about my workflow. Let’s fix this.
Introduction
Git is a powerful tool. It helps us keep the history of our projects, which is useful in the case we want to go back in time, still support an old version, or simply have traceability. It also helps us collaborate with others, by providing a way to share changes to the code and integrate them. It helps to find bugs, by allowing bisecting on which change it has been introduced. But it can also seem to be very messy to use when first approaching it.
I’ve been there, so I feel the pain of newcomers, and the vast amount of information there is to understand about Git before being really comfortable with it. Something clicked when I read the Pro Git book, which I advise you to read because it explains very well all the concepts behind Git. I’ve also read a lot of articles explaining different workflows, good practices, and tips, which are now an integral part of my daily workflow.
In this article, I will explain how I use Git in both my personal and professional workflows. This is not a full-featured tutorial, but rather an opinionated collection of pieces of knowledge and practices I have learned during the last few years, and found useful to help me understand what I am doing when using Git.
Basics
TL;DR In this section, I am talking about some Git basics, like the concept of a local repository, worktree, the staging area, the fact commits are snapshots, and that Git branches are like moving pointers to commits. If you already know all of this, you can jump to the next section.
Before to get into the workflow details, let’s review a few important concepts.
Git is a distributed version control
system.
This means everyone gets a full copy of the repository on their machine. It is
located in the .git/ directory we can find at the root of a worktree.
We have two ways to create a local repository:
-
by creating an fresh new one:
git init— this initialises a Git repository in the current directory;
-
by cloning an existing remote repository:
git clone <path-to-repository>— this creates a new directory named after the respository, and clones the repository inside it.
The local repository contains the complete history and remote branch references. This has a first implication: any commit will increase forever the size of this repository, and make it longer to download for everyone. We must then avoid to commit anything that could be generated otherwise, like build outputs, or simply big files, as they woud take space forever, even if we remove them in a later commit. Git has been built to work on text files—source code, documentation, configuration—not binary.
A few definitions
I’ve used already two interesting words here: repository, and worktree. A worktree is a directory containing the files of the project we are working on, in their current working state. It is our project’s root directory. A repository is a database containing a chained list of commits, which makes the history of our project. Commits are snapshots of the worktree at a given point in time.
A commit references zero, one or two parents, and this gives us a directed acyclic graph that goes down to the initial commit A:
                                D ← E           H ← I
                              ↙       ↖       ↙
                    A ← B ← C ←–––––––– F ← G ←—— J
In this graph, A has no parent: this is an initial commit. F, which has two parents, is called a merge commit: it merges the state snapshotted in C with the one snapshotted in E.
Commits are content-addressed. This means they are “named” depending on their
content: if the commit is changed, its “name” must change as well. More
specifically, Git commits are addressed using the SHA-1 hash of their content,
including the commit message, date and references to other commits. We can then
use this hash to refer to an exact version of our project. For instance, if we
take a random commit from the git log output of this blog, we can read:
commit e1b8b6411f012993df1b3464e5ea42408623e8ef
Author: Jean-Philippe Cugnet <jean-philippe@cugnet.eu>
Date:   Sat Sep 24 11:26:31 2022 +0200

    fix(content): fix a link in “TypedStruct 0.2.0: plugin interface”
The first line shows the commit hash:
e1b8b6411f012993df1b3464e5ea42408623e8ef. For convenience, commits can also be
refered to by their short name, composed of the first few characters of the
hash. Here, we can refer to this commit by e1b8b64, but it may be non-unique
in the history, contrary to the first one.
As you imagine, referring to commits by their hash is not always handy. Hence, Git has a concept of references.
References
References allow us to refer to a commit or a list of commits in a human-friendly way. Their name can be composed of any UTF-8 character with a few exceptions. There are two types of references: tags and branches.
A tag is a label for a given commit. It can be used, for instance, to refer to a specific version of our code, like a release. A tag can be created with:
git tag <tagname> [<commit> | <object>]
When the commit or object is omitted, the tag is created at the current HEAD.
Once pushed, a tag must not be changed, as other people will expect a tag to always refer to the same thing. We would break this contract by changing it.
On the other hand, a branch is a moving reference. It is intented to be the head of the history for some ongoing work. If there are multiple ongoing changes in our project, different branches can be created, and their history can diverge to form two separate branches of a tree. It can be seen like this:
                                     a-branch
                                       ↓
                         develop   D ← E
                               ↓ ↙
                       A ← B ← C ←– F
                                    ↑
                                another-branch
At a previous point in history, both develop, a-branch and another-branch
may have pointed to “C”. Then, someone has committed “D”, then “E” on
a-branch, which make it advance, and someone has committed “F” on
another-branch. Their history diverge, while develop still points to “C”.
To create a branch and switch to it, we can run:
git switch -c <branch-name>
ℹ️ Internally, references are just files containing the hash of a commit. We can see them in
.git/refs/. For instance, here is the definition of themainbranch of this blog:[jpc@saturne]:~/Documents/Blogs/ejpcmac.net % cat .git/refs/heads/main e1b8b6411f012993df1b3464e5ea42408623e8efWhen we create a new branch with Git, it simply adds a new file here, containing the hash of a commit.
But how does Git know on top of which commit or branch are we currently working?
In fact, there is a special reference named HEAD. The HEAD can point either
directly to a commit, which we call a detached HEAD, or to a branch, which is
the usual case:
                                      HEAD
                                       ↓
                                    develop
                                       ↓
                               A ← B ← C
When creating a new commit, it is added after the commit pointed by the current head, and the branch is advanced:
                                        HEAD
                                         ↓
                                      develop
                                         ↓
                             A ← B ← C ← D
When doing a git switch to change the current branch, HEAD is changed to
point to the other branch. For instance, if we run git switch -c new-branch,
we obtain something like:
                                             HEAD
                                              ↓
                               develop   new-branch
                                      ↘ ↙
                           A ← B ← C ← D
If we then do another commit, as HEAD is now pointing to new-branch, it is
added after D and new-branch is updated:
                                             HEAD
                                              ↓
                               develop   new-branch
                                     ↓   ↓
                         A ← B ← C ← D ← E
ℹ️ As other references,
HEADis stored in a file in the repo:.git/HEAD. For instance, when working on this article, my head is pointing to thearticle/git-workflowbranch:[jpc@saturne]:~/Documents/Blogs/ejpcmac.net % cat .git/HEAD ref: refs/heads/article/git-workflow
The staging area
To help select what we want to include in a commit, as we will see in Crafting a history, Git has a staging area. Committing to the repository is split in two operations:
-
we select which (parts of a) file(s) we want to add to the commit:
git add <path-to-file-or-dir> -
we finalise our commit by running:
git commit
If we want to commit all the changes anyway, these operations can be combined by running:
git commit -a
A few commands
Creating a git repository
git init— initialises an empty repository in the current directorygit clone <url>— clones a remote repository
Getting information
git status— gets the status of the current worktree (HEAD/ branch, local modifications, …)git log— shows the commit loggit diff— shows unstaged changes in the current worktreegit diff --staged— shows staged, not yet committed changes
Committing changes
git add <file>— adds files or part of a file to the staging areagit reset <file>— removes the file from the staging area (without discarding any data)git commit -m <message>— commits the content of the staging area
Managing branches
git branch— lists local branches and shows the active onegit branch <name>— creates a new branch at the currentHEADgit branch -d <name>— deletes a branchgit switch <name>— switches to another branchgit switch -c <name>— switches to a newly created branchgit merge <branch>— merges a branch
Rewriting the history
git commit --amend— amends the last commitgit rebase <reference>— rebases the current branch on top of a given referencegit rebase -i <reference>— modifies several commits
Managing remotes
git remote add <name> <url>— adds a remotegit fetch [remote]— updates the local image of the remotegit pull [remote]— fetches and merges changes from the upstream branchgit push [remote] [branch]— pushes changes to the remote
Stash
git stash— put aside uncommitted changes in the stash stackgit stash pop— reapply the last stashed changes
Cleaning up a repository
git reset --hard HEAD— discard all changes from the current worktreegit clean -idx— deletes all files unfollowed by Git in the current worktree
Branching strategy
Git branches allow to work on several topics in parallel while not perturbating the other ones. They also enable workflows where commits are not directly integrated into the main development branch, allowing to do some code review before accepting the changes.
There are many valid branching strategies with Git: this is the power of this tool, which is quite flexible. I’ll explain how I deal with branches in my personal and professional workflows, which are both based on the same standard.
Naming and flow
In most of my projects, I use git-flow, originally described by Vincent Driessen in this article. I advise you to read the article by yourself to get more details about the flow and its edge cases. I will describe here how I am using it in practice on differently-sized projects.
The idea of the flow is to separate ongoing work from production code, by using
two branches with an infinite lifetime—main (or master) and develop—, and
additional supporting branches with a limited lifetime.
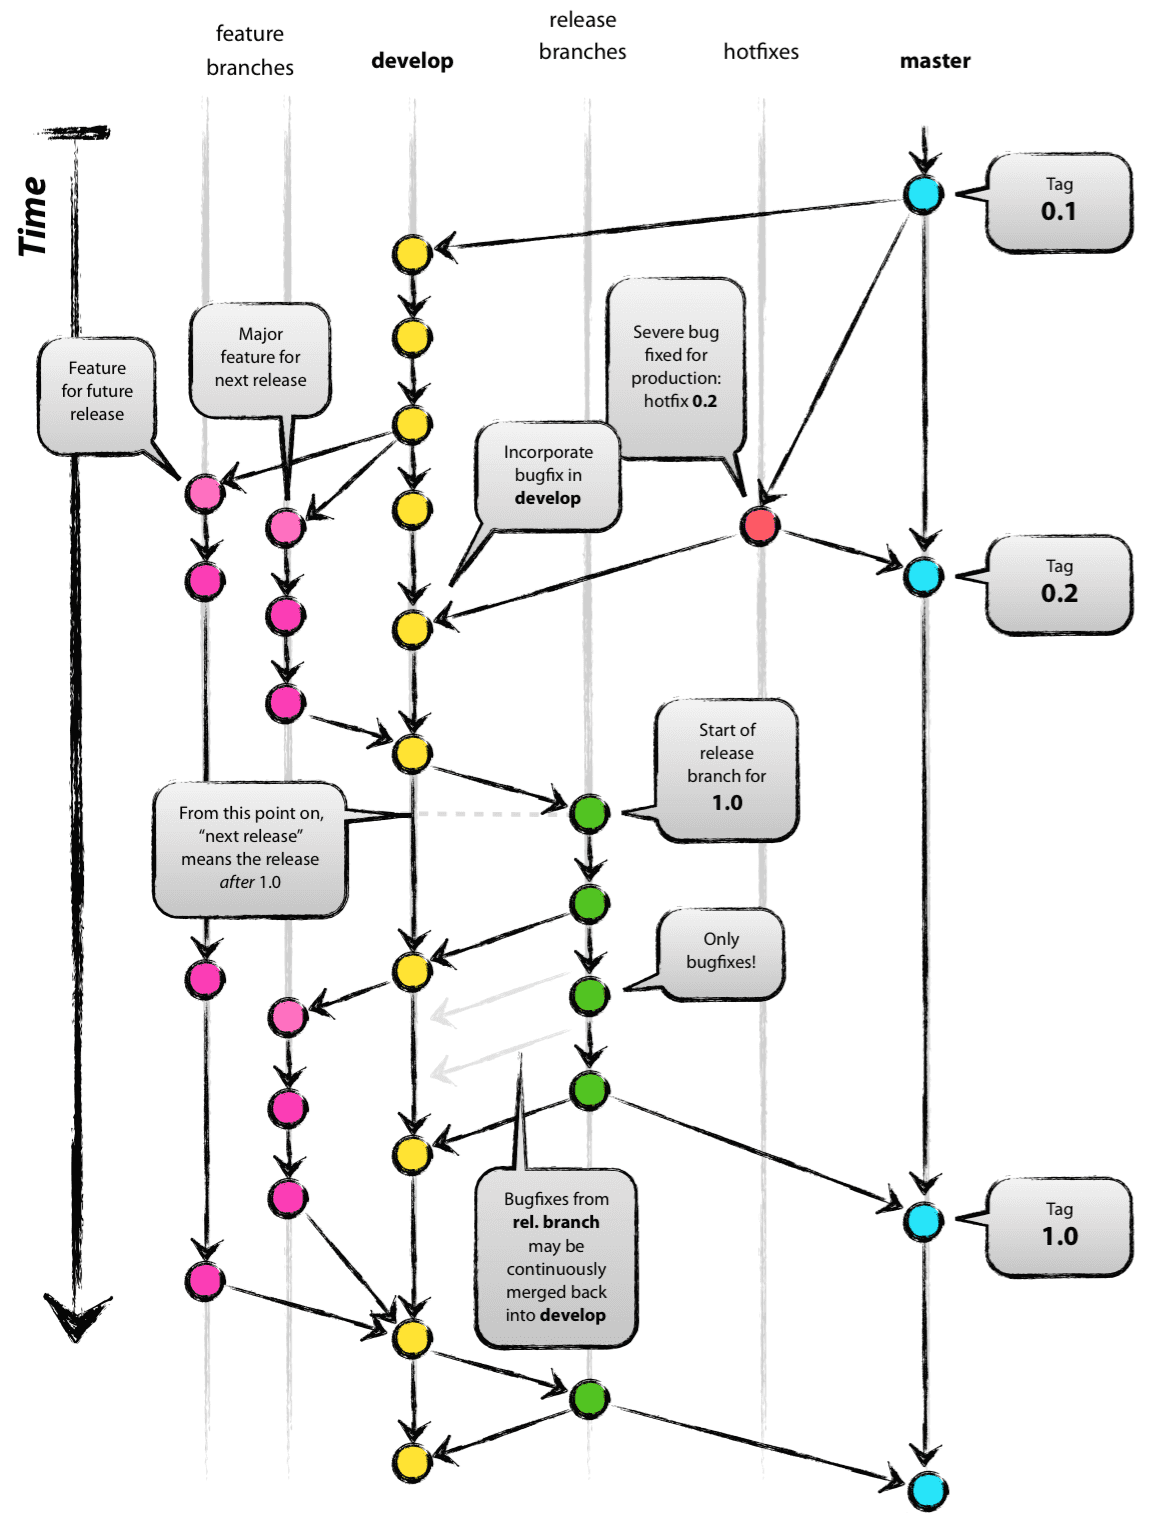
The main branch—or master in the diagram—is reserved for production-ready
code. No actual work should happen on it. Usually, it only contains merge
commits, which are the releases. The development for next releases occurs on
develop, and when the project is ready, this work is merged into main.
In addition to these two branches, git-flow defines supporting branches:
- Feature branches allow to work on features while not integrating them
directly in
develop. This can be useful to gate the integration on code reviews, or keep the possibility to postpone the feature to a later release. These branches start fromdevelopand are merged back intodevelop. They are usually namedfeature/<feature-name>. - When the next release is feature-complete, a release branch allows to
isolate its stabilisation. Developers are then free to continue to add new
features on
developwithout interfering with the release process. Only bug fixes should be committed as they are found. Release branches start fromdevelopand are merged intomain. To port all the late changes to the next release, the release commit onmainis then merged back intodevelop. If the branch lives long enough to justify it, it can be regularly merged intodevelopso the development of the next version also benefits from the patches. Release branches are usually namedrelease/<version-number>. - In the unfortunate event where a bug is found in a release, and fixing it
cannot wait for the next one, we can use a hotfix branch. To avoid pulling
other changes in, such branch is created from the release commit itself on
main, and merged back intomain. The newly created patch release is then merged intodevelop. Hotfix branches are usually namedhotfix/<version-number>.
To help following this flow, the author had written a Git
extension which adds new commands under the
git flow command. I use a fork of it,
git-flow-avh, which is the one
commonly found in different Linux distributions. I will describe its usage in
the next subsection.
In addition to features branches, git-flow-avh adds bugfix branches. These
are like feature branches: branched from develop and merged back into
develop, but they should contain only bug fixes. They are named
bugfix/<some-bug>. This is useful to track bug fixes that are to be included
in the next release.
I tend to use a few more branch types for very specific use cases:
- When I need to update the documentation of a release, without touching the
code, I create a docfix branch. This branch is conceptually like a hotfix
branch: created from
main, then merged intomain. I then create a new tag on main, namedv<version-number>+docfix-<number>, like inv0.2.1+docfix-1. - While debugging, I sometimes create a debug branch to add some logs or
update the code to ease the debugging, so that I can share my tweaks with
colleagues. Debug branches are created from whrerever the bug has been
reported, and are never meant to be merged. I name them
debug/<some-bug>, and delete them as soon as the debugging session is over. - While filling a bug report, I sometimes create a bugreport branch to commit
a test reproducing the issue. I create it from where I found the issue, and
name it
bugreport/<some-bug>, and rename it tobugreport/<id>when I have an ID from the bug tracker. - Experiment branches are created from
developand never merged. They can be deleted later, kept forever, or some day transformed into a feature branch. I name themexperiment/<some-description>.
On big projects, in the rare occasion when features need to be integrated on
another branch than develop, we can create an integration branch with a
specific topic. They are branched out from anywhere useful, and eventually
merged into develop. They behave like develop: feature branches can be
created and merged back into them, and pull requests can target them. We name
them integration/<topic>.
git-flow-avh setup
git-flow-avh is an extension for the Git command line that eases to work with
git-flow.
On NixOS or any system with Nix installed, you can start a shell with Git and git-flow available by running:
nix-shell -p git gitAndTools.gitflow
On Ubuntu, you can install it with:
sudo apt install git-flow
For other systems, please refer directly to the official documentation.
git-flow-avh walktrhough
When creating a new project, I create a new directory and put at least a
README.md shortly describing the project, create a new Git repo and do my
first commit on the main branch:
mkdir my_project
# ...
# Create a bunch of files, like a README.md, project manifest, …
# ...
git init
git add .
git commit -m "initial commit"
git remote add origin https://path/to/remote/repo.git
git push -u origin main
Then, I run:
git flow init
This command asks a few questions, then configures the local repo according to
the answers, creates the develop branch and switches to it.
Any contributor willing to use the git flow subcommands would also need to run
git flow init first. As I want that everyone has the same configuration, I
tend to add a script named .gitsetup at the root of my projects with the
following content:
#!/bin/sh

set -e
set -x

# Setup git-flow
git flow init -d
git config gitflow.prefix.versiontag "v"
git config gitflow.feature.finish.no-ff true
git config gitflow.release.finish.sign true
git config gitflow.hotfix.finish.sign true
It is then just a matter of running ./.gitsetup when getting a fresh clone of
the repo to configure it properly.
ℹ️
git flowis just a wrapper around standard Git commands. It is then completely valid that only some contributors use it in a project while others don’t.
On small projects, when I now where I am going feature-wise and want to iterate
quickly, I usually work directly on develop. Contributors create branches from
develop, without a clear naming scheme, and open pull requests so they are
reviewed and merged back.
If I want to start a feature that can be longer to develop and I’m not sure whether to integrate it in the next release, I create a feature branch:
git flow feature start <feature-name>
This creates a branch named feature/<feature-name> and switches to it.
If later I want to rebase it on top of the latest develop, I can run:
git flow feature rebase [feature-name]
Then, when the work on this feature branch is finished, I can merge it and delete it in one command with:
git flow feature finish <feature-name>
A lot of other helpers are defined to help manage feature branches:
git flow feature <subcommand>
# checkout  --  checkout
# diff      --  diff
# finish    -- Finish a feature branch.
# list      -- List all your feature branches. (Alias to `git flow feature`)
# publish   --  publish
# pull      --  pull
# rebase    --  rebase
# start     -- Start a new feature branch.
# track     --  track
On bigger projects, multiple persons work together on multiples features. We
want to ensure the code is properly reviewed before it is integrated. Pushing to
develop is then forbidden, so that all the feature development work occurs on
feature branches. They are then merged back through pull requests after
approval from architects.
We can manage bugfix branches in the same way we do for feature branches:
git flow bugfix <subcommand>
git flow bugfix create <name> creates a new bugfix branch from develop,
while git flow bugfix finish <name> merges it back to develop.
These are different from hotfixes, which are branched from main and merged
back into main. Commands are also available to handle those cases:
git flow hotfix <subcommand>
Doing git flow hotfix finish automatically the merges into main, tags the
commit with the new version number, and merges back the tag into develop.
When the next release is feature-complete, we can start a release by running:
git flow release start <version-number>
This creates a new branch from develop, named release/<version-number>. On
small projects, it usually contains only one commit in which I increase the
version number and put the date in the CHANGELOG.md. If the changelog was not
up to date, it is the occasion to update it in another commit. On bigger
projects, final patches are integrated in this branch while the product is
undergoing a strong validation process.
On projects with push right on main, I then run:
git flow release finish <version-number>
This command is pretty useful, since it does a bunch of things:
- it merges the release branch into
main, - creates a tag on the merge commit—named
v<version-number>with my configuration, - and merges back the newly created tag into
develop.
When new releases must follow an approval process, push can be forbidden on
main. Then, releasing a new version is a matter of opening a pull request from
the release branch to main.
Worktrees
By default, when we create or clone a Git repository, it has a single worktree:
the directory containing the .git/. On small projects, where I work mostly on
one feature at a time, this is not an issue: I can finish my ongoing work before
to do something else. In the rare case I need to switch to a reference branch or
code review, I can stash my work:
git stash --include-untracked
git switch <some-other-branch>
However, this does not scale well on big projects: I can work on several features, bugfixes or code reviews concurrently, all depending on the moving priorities of the project. In this case, relying on several worktrees to ease the context switching is more than helpful.
Worktree basics
Git has built-in subcommands to handle worktrees:
usage: git worktree add [<options>] <path> [<commit-ish>]
   or: git worktree list [<options>]
   or: git worktree lock [<options>] <path>
   or: git worktree move <worktree> <new-path>
   or: git worktree prune [<options>]
   or: git worktree remove [<options>] <worktree>
   or: git worktree repair [<path>...]
   or: git worktree unlock <path>
To create a new worktree, we can do:
git worktree add ../some-feature
This creates a new branch some-feature, and checks it out in a new directory
../some-feature.
To instead checkout an existing branch, we can do:
git worktree add ../some-feature <existing-branch>
We can list the worktrees attached to our repository by running:
git worktree list
This gives us a list of paths, the commit at their HEAD and their current
branch:
/home/jpc/Documents/Blogs/ejpcmac.net   e1b8b64 [article/git-workflow]
/home/jpc/Documents/Blogs/some-feature  e1b8b64 [some-feature]
The worktree created by git init or git clone is called the main worktree:
it contains an actual .git/ directory, with all the information. Other
worktrees are called linked worktrees. Instead of a .git/ directory, they
contain a .git file, holding something like:
gitdir: /home/jpc/Documents/Blogs/ejpcmac.net/.git/worktrees/some-feature
We can run Git commands from any worktree, as they share the same repository.
For instance, if we do a git fetch in one of the worktree, we can get the new
references from any other worktree.
When we are done with a worktree, we can remove it:
git worktree remove ../some-feature
Organising worktrees
When we init or clone git repos, we obtain the following layout:
my_repos
├── repo1
│   ├── .git/
│   └── <other files>
│
├── repo2
│   ├── .git/
│   └── <other files>
...
If we start using worktrees without changing the layout, we end up with something like this:
my_repos
├── repo1
│   ├── .git/
│   └── <other files>
│
├── repo1_feature1
│   ├── .git
│   └── <other files>
│
├── repo1_feature2
│   ├── .git
│   └── <other files>
│
├── repo2
│   ├── .git/
│   └── <other files>
...
I find this does not reflect the hierarchy: we have here multiple repos, and in
repo1 we have multiple worktrees. When working with worktrees, I then prefer a
layout like this one:
my_repos
├── repo1
│   ├── develop
│   │   ├── .git/
│   │   └── <other files>
│   │
│   ├── feature1
│   │   ├── .git
│   │   └── <other files>
│   │
│   └── feature2
│       ├── .git
│       └── <other files>
│
├── repo2
│   ├── .git/
│   └── <other files>
...
Here, repo2 has a single worktree, so I keep the default layout, while repo1
has three, which I club together under a repo1 directory.
I generally always keep a clean checkout of the develop branch in a develop
worktree, so I can use it to check the latest code when questions arise. As it
lives forever, this is my main worktree. Then, I create one worktree per feature
I am working on. I also keep a code-review worktree around to check out
locally any pull request I am reviewing.
To setup such layout with a fresh clone, we can do:
mkdir repo_name
git clone path/to/repo_name.git repo_name/develop --branch develop
To convert an existing mono-worktree repo to this layout, we can do:
mv repo_name develop
mkdir repo_name
mv develop repo_name
Writing commit messages
Each commit comes with a message, whose purpose is to contain information about
the change. The manual page of git-commit says:
Though not required, it’s a good idea to begin the commit message with a single short (less than 50 character) line summarizing the change, followed by a blank line and then a more thorough description. The text up to the first blank line in a commit message is treated as the commit title, and that title is used throughout Git.
ℹ️ In this article, I may use exchangably the expressions “commit title”, “commit name” or “short description”: they all refer to the first line of a commit message.
Following the advice from the Git manual gives us something like this:
Demonstrate what is a commit

This is the long description of a commit. It should be separated from
the title by a blank line. While the title should not be longer than
50 characters, this long description can span up to 72 characters.
It can span on multiple lines, and add many details on what are the
changes introduced by the commit.
Reading a Git history is a daily task for many programmers. Whether it is to keep up with the latest changes, as part of a code review, or to track down the origin of a bug, properly named commits help us to find the information we are looking for.
The commit title should contain useful information about what changes are introduced by the commit. For instance, “Add a function to get the meaning of life” is useful, because we know at least what kind of feature we are adding. Even if the exact meaning is still a bit blurry, the long description can add more information. Conversely, “Implement the changes” is not useful: it carries no meaning, except that we are changing something, which is expected anyway.
To ease the readability of the overall history, the naming should be consistent in a given project. To ensure this, a project should define or adopt a commit convention.
ℹ️ When contributing to a project without a convention, first take a look at the Git log and take your inspiration from it when editing your commit message. Consistency is more important than your own conventions or habits.
Though there are many conventions on how to write commit messages, most of them share at least this: the title should start with a verb in its imperative form, and not end with a dot. Its first letter may or may not be capitalised, but this should be decided and applied consistently.
These are valid titles:
Implement the snapshot featureadd a get method to some_lib::SomeType
These should be avoided:
Adds a set method to some_lib::SomeTypeA new method
A good rule of thumb is to check if our commit message would fit in this sentence:
If I apply this commit, this would (replace with commit title).
Conventional Commits
In my projects, I am using Conventional Commits. It specifies the format of a commit message as follows:
<type>[(scope)][!]: <title>

[description]

[footers]
This gives subject lines like:
feat(ui): add a control for the brightnessfix(hal): properly handle SPI mode 1refactor: rename private functions according to coding rulesstyle: run the code formatter on legacy modules
The type helps to better state the intent of a commit in a standardised way: is it introducing a new feature? Is it fixing an issue? Refactoring the code? Applying style change? Updating tests or the documentation? All these cases can be classified by the type.
The convention itself is thought to work with Semantic Versioning, so it defines only two types:
fix– fixes a bug (implies a patch version increment),feat– adds a new feature (implies a minor version increment).
Breaking changes, that will need a major version increment, are denoted with an
exclamation mark before the colon, as in refactor!: rename public types to match standards.
Many projects define other types to help categorise the commits. In my projects, I define the following ones, which are accepted by the CI:
sec– fixes a security issue,perf– increases the performance,refactor– changes the code in a way that does not fix any issue nor adds a new feature,test– updates only the tests,docs– updates only the documentation,style– performs some style update, like running a code formatter,deps– adds, removes or update a dependency,ide– updates the IDE configuration,build– updates the build system or its configuration,ci– updates the CI configuration,revert– reverts a previous commit,chore– any maintenance commit not fitting other types (incrementing the version, updating the copyrights, etc.).
In addition to these ones, I also use the following ones as temporary commits:
wip– a work-in-progress commit to be undone and split better later,debug– introduces changes only for debug. I use these typically on my debug branches.
These two last ones are not accepted by the CI and should never be merged into
develop.
Crafting a history
In projects involving multiple persons, our code generally goes through a code review process. This implies that someone else will read our changes and need to understand our intent. If our intent is not clear enough, the reviewer may have questions, slowering the review process.
A polished Git history can greatly help a code review by providing information about the intent we had behind each change. To achieve so, we need to split our work in atomic commits.
An atomic commit is the minimal set of changes that is consistent. For instance, if we change the name of a function, we have to update its callers as well, otherwise the program would not work. If we implement a new feature, but the code needs some refactoring to implement it, then the refactoring should be in one or more separate commit(s) before the one introducing the feature. The number of steps we want to split the refactoring in depends of its size. Remember that all of this is about sharing our intent in easy-to-analyse steps. If our commit messages contains an “and”, it is a smell that it could be split.
When I split a refactoring work in multiple commits, I tend to explain what I am aiming to do in the long description of the first commit. This is like telling a story. Let me extract a few commits messages from an open source project I am working on (you can view them as well on GitHub and compare the ease of following them individually instead of the full diff):
refactor(ercp_basic)!: rename command to transcieve

This is the first step of a refactoring operation to remove the need for a
command attribute, which is error-prone.
feat(ercp_basic): introduce a new command method

This method now take a closure, in which the ERCP Basic driver is made available
as an argument, so the user can call transcieve. In a future commit, the full
driver will be replaced by a Commander, with a reduced scope, and transcieve
will be available only in Commanders, to force the usage of this new method.
refactor(ercp_basic): use the new command method in built-in commands
refactor(ercp_basic)!: extract transcieve to a Commander struct

By doing this, and not providing a public constructor for the Commander, the
only way to call transcieve is now inside the closure passed to the command
method. This way, it is not possible anymore to forget to reset the receiver
state.
refactor(ercp_basic): do not use the command attribute
This refactoring operation had a goal: switch from an API to a less error-prone one, which I stated in the first commit. Doing all of this in one commit would have been possible, but not easy to follow, because it implied extracting a method in a new type while renaming it, repurposing the original method and updating its usage. Doing this in multiple, atomic commits, is much more readable. Between each of these steps, the code remained consistent and tests were still passing.
Beside readability, using atomic commits also help to split the work to keep only parts of it. Maybe we don’t want to ship the new feature right now, but we still want to merge the refactoring it implied? It also helps root-causing an issue, thanks to more detailed changes.
OK, you’ll tell me: this is a good idea in theory, but it is actually difficult to do everything right the first time. And you’re somehow right: as programmers, we often work in a non-linear way, doing multiple changes in parallel to see how it goes.
In fact, doing the effort to craft a good history also helps us to better organise our thoughts. With experience, we start to think of our changes in term of atomic steps, and this smoothens the refactoring experience. But in any case, we still do messy things, and we need tools to help us craft a good history in any situation.
Tools to write a better history
Committing parts of a file
It is quite frequent to have a bunch of unrelated changes in our worktree. In
this case, we want to commit them separately. For this purpose, Git has a
staging area: we must choose what to include in our commit before actually doing
the commit. This is done through the git add command.
git add not only lets us choose which files we want to include in a given
commit: we can select which lines of a given file to include. For this, we need
to use the interactive mode: git add -i. We can then choose to add whole files
with the update command, or choose to add parts of a file thanks to the
patch command.
As an alternative, we can use a graphical interface for this purpose—this is
what I am doing. Both magit in Emacs and the integrated Git support in VSCode
are great.
In VSCode, we can add an individual change in two different ways:
-
in the normal editor, we can click on the diff line next to the line numbers to show a change. This view lets us add it to the staging area by clicking a plus sign at its top right;
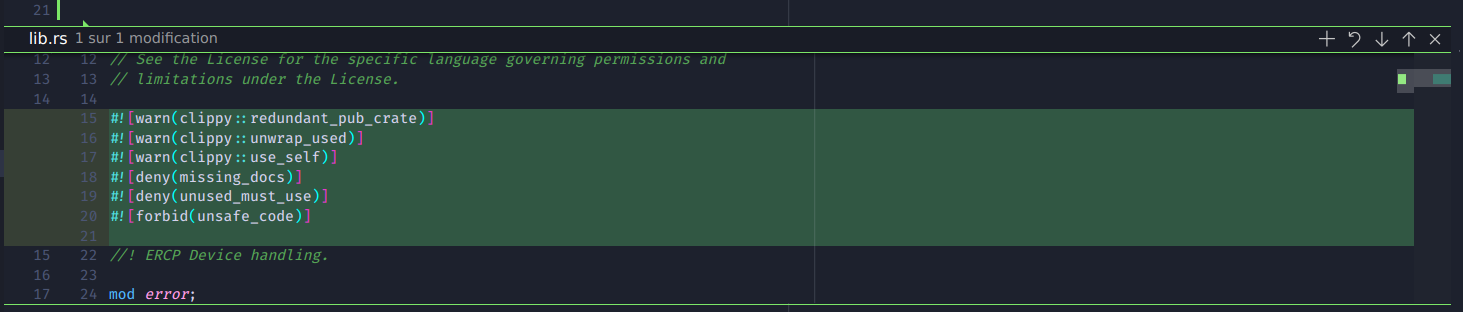
-
in the diff view, we can select one or more lines, right-click and select “Stage selected ranges”.

This one is by far my preferred option, as it lets us add down to a single line.
Editing the last commit
Sometimes we have just finished a commit when we realise something is missing.
In this case we can edit the last commit by preparing an update in the staging
area, then running git commit --amend. If what we missed is only the commit
message, then we can run this command with an empty staging area: we will be
prompted to update the message.
Interactive rebase
When our history is already messy but we want to fix it, Git has a quite powerful feature: interactive rebase. We can delete, reorder, squash, rename or edit commits. I remember this feature was a bit scaring me by the time I came to learn its existence. It does not have to: today, it is part of my daily workflow to get a clean history.
If we want to change the history for our last 5 commits, we can run:
git rebase -i HEAD~5
It will then open our configured $EDITOR with a content similar to this:
pick 868a768 refactor: make the API more flexible
pick 14c0d42 feat: add a new optional parameter
pick 924c803 fix: something that was broken during the refactor
pick e612680 update the README.md
pick 360b836 chore(version): bump to 1.2.5
Each line is in fact a command: when we save and close our editor, Git plays them from top to bottom. Reordering lines or removing them reorders or removes the commits. We can change the first word of a line to change the command. In the same editor, a long comment describes the available commands to help us:
# Rebase 868a768..360b836 onto 79b2848 (5 commands)
#
# Commands:
# p, pick <commit> = use commit
# r, reword <commit> = use commit, but edit the commit message
# e, edit <commit> = use commit, but stop for amending
# s, squash <commit> = use commit, but meld into previous commit
# f, fixup [-C | -c] <commit> = like "squash" but keep only the previous
#                    commit's log message, unless -C is used, in which case
#                    keep only this commit's message; -c is same as -C but
#                    opens the editor
# x, exec <command> = run command (the rest of the line) using shell
# b, break = stop here (continue rebase later with 'git rebase --continue')
# d, drop <commit> = remove commit
# l, label <label> = label current HEAD with a name
# t, reset <label> = reset HEAD to a label
# m, merge [-C <commit> | -c <commit>] <label> [# <oneline>]
# .       create a merge commit using the original merge commit's
# .       message (or the oneline, if no original merge commit was
# .       specified); use -c <commit> to reword the commit message
#
# These lines can be re-ordered; they are executed from top to bottom.
#
# If you remove a line here THAT COMMIT WILL BE LOST.
#
# However, if you remove everything, the rebase will be aborted.
#
In our case, we want to integrate 924c803 fix: something that was broken during the refactor directly in the commit where the issue was created, as if it did
not happen. To do so, we move it just after the refactor commit, and mark it as
fixup. This means it will be integrated in the previous commit. We also want
to update the title for the fourth commit, which should start with docs to
follow Conventional Commits. We can reword it for this purpose. There is also
an error in the version, which should be 1.3.0 because we introduced a new
feature. We then need to edit the commit to both change its content and
message.
We end up with something like this:
pick 868a768 refactor: make the API more flexible
fixup 924c803 fix: something that was broken during the refactor
pick 14c0d42 feat: add a new optional parameter
reword e612680 update the README.md
edit 360b836 chore(version): bump to 1.2.5
After saving an closing the editor, Git performs the actions in a batch, asking our input when needed.
Fixing previous commits
We’ve seen in the previous section that we can “merge” a commit in another one
to include a fix in the original commit by marking it as fixup in an
interactive rebase session. In fact, we can automate this process.
Git provides a --fixup option to git commit. It takes the hash of a commit
and generates a commit with the same name, prefixed by fixup!. For instance,
let’s say we have the following recent history (most recent at bottom):
868a768 refactor: make the API more flexible
14c0d42 feat: add a new optional parameter
e612680 docs: update the README.md
We see that we have introduced an issue in 868a768 and want to fix it before
asking for code review. We can then do:
git add <file with the fix>
git commit --fixup 868a768
This gives us the following:
868a768 refactor: make the API more flexible
14c0d42 feat: add a new optional parameter
e612680 docs: update the README.md
565ab3e fixup! refactor: make the API more flexible
Now, git rebase -i accepts a --autosquash option:
git rebase -i --autosquash HEAD~4
This opens an editor with the following content:
pick 868a768 refactor: make the API more flexible
fixup 565ab3e fixup! refactor: make the API more flexible
pick 14c0d42 feat: add a new optional parameter
pick e612680 docs: update the README.md
As you can see, the commit generated by git commit --fixup has been
automatically marked as fixup, and placed just after the commit it fixes. We
can then simply close the editor to finalise our fix.
Yet remains one manual operation: getting the commit hash to pass to git commit --fixup. As explained in this excellent
article
by Jordan Elver, we can define a git fixup alias to select the commit through
fzf by adding this to our ~/.gitconfig:
[alias]
    fixup = "!git log -n 50 --pretty=format:'%h %s' --no-merges | fzf | cut -c -7 | xargs -o git commit --fixup"
If you don’t know about it, fzf—for FuzZy Finder—is a command line tool that
takes a text input, lets you filter through its lines, and returns the selected
line. For the alias to work, you need to install it on your system. It should be
available on pretty much any Linux distribution.
Handling remotes
As Git is distributed, it does not contain the concept of a central repository, like SVN would. Most operations are actually local-only and do not interact at all with other systems. Git can however know about remote repositories, simply called remotes, with which we can interact to push or pull changes. This is one of the ways to share commits with other developers.
Basics
We can see the current remotes and the address they point to by running:
git remote -v
A local repo freshly created by git init will not have any remote. A cloned
repo, however, comes with a pre-configured remote named origin and pointing to
the address passed to the git clone command. For instance, the local repo for
my blog knows about a remote called origin:
origin  https://gitlab.ejpcmac.net/jpc/blog.git (fetch)
origin  https://gitlab.ejpcmac.net/jpc/blog.git (push)
We can easily add a remote with:
git remote add <name> <URL>
When we create a remote, Git maintains a mirror of its references in our local repository. To update the state of these references, we can run:
git fetch
For instance, let’s imagine we have two repos: one local repo, and a remote one
we name origin. In the local one we have several branches: main, develop
and some-branch. On origin we have main, develop and another-branch.
If we add origin as a remote in our local repo, then do a git fetch, the
local repo will contain a mirror of the references present in origin:
Local repo                           origin
+------------------------+           +----------------+
| main                   |           | main           |
| develop                |           | develop        |
| some-branch            |           | another-branch |
|                        |           +----------------+
| origin/main            |
| origin/develop         |
| origin/another-branch  |
+------------------------+
This is important, because all operations between local and “remote” branches
are in fact offline operations with this local mirror. Let’s say for instance we
want to rebase our local develop branch on top of the develop branch in the
origin remote:
# Switch to our local development branch.
git switch develop
# Update our mirror of origin.
git fetch
# Rebase our current branch (develop) on top of origin/develop.
git rebase origin/develop
Here, the actual rebase operation occurs completely offline. The only access to
the network is done during the git fetch command.
As the remote references are mirrored locally, we can checkout any of them:
git checkout origin/develop
Note that contrary to local branches, remote reference are read-only, like tags.
Hence, doing so results in a detached HEAD, as we cannot change it. However,
this is quite handy to inspect a remote branch without creating or updating a
local one.
To update a remote branch, we need to push some commits to it. We can run:
git push <remote> <branch>
like in:
git push origin feature/my-feature
Upstream branches
As you may have noticed, both our local repo and origin have some branches
with a matching name. Let’s take main as an example: main and origin/main
are actually two different branches. This is important to keep this in mind to
understand how Git works. They may or may not be in sync, and the way even have
a completely different history.
When they are actually related, which is the case most often, we say that
origin/main is an upstream of main. That is, main and origin/main
should eventually remain in sync, and origin/main is the source of truth.
This is so common that Git allows to attach this information to a branch:
git switch main
git branch --set-upstream-to origin/main
We can see the upstream of our local branches by running:
git branch -vv
This shows the local branches with some more information :
* article/git-workflow 93b68a2 [origin/article/git-workflow] wip: “About my Git workflow”
  main                 e1b8b64 [origin/main] fix(content): fix a link in “TypedStruct 0.2.0: plugin interface”
Here, we can see that both the branches have an upstream, indicated between brackets.
Most commands are able to make use of this information. For instance, git status tells us whether our local branch is in sync with the remote:
On branch main
Your branch is ahead of 'origin/main' by 1 commit.
  (use "git push" to publish your local commits)

nothing to commit, working tree clean
Commands to synchronise the branch with its upstream (push, pull, rebase, merge)
can omit the branch name and remote. For instance, to push changes to the
upstream branch, we can just run git push. Same goes to do a fast-forward
merge of the remote branch in our local branch: git merge --ff, without any
branch name.
Creating a local branch from a remote branch
We’ve seen how to configure the upstream for an existing local branch. But what
if we want to create a new local branch from a remote branch? This is in fact
pretty simple: if there is a branch named some-remote/some-branch, we can
run:
git switch some-branch
Git then automatically creates some-branch pointing to the same commit as
some-remote/some-branch, configures its upstream to be
some-remote/some-branch, and switches to it.
Publishing a local branch to a remote
When we have a local branch that is not yet on the remote, we can push it and set the upstream in one command:
git push -u <remote> <branch>
After this first push, as our branch now have a remote, we can simply do:
git push
We can even automate further by adding this to the ~/.gitconfig:
[push]
    autoSetupRemote = true
With this configuration, we can do a simple git push even when the branch has
no upstream configured yet. It then automatically pushes the branch to the
default remote—the one we have cloned from, unless changed.
Good practices
In this section, I’m talking about good practices I’ve come to follow after asking the Web several times for advice on how to handle remotes, merge vs rebase, …
Updating remote references
When I want to get work that has been pushed by others to a remote, I usually
don’t use git pull, but instead break it down to simpler commands to control
exactly what I am doing. First, I update all the remote references:
git fetch -p --all
The --all option is pretty explicit: if we have multiple remotes, it will
update the mirrored references for all of them. -p, or --prune in its long
version, delete obsolete references. For instance, if the branch some-feature
has been removed on origin, it will remove our origin/some-feature reference
to it. Without this option, obsolete references are never removed. Git is
conservative by default, but I like to keep a clean mirror.
As I use this command quite often, I have aliased it to gfa—“Git Fetch All”.
Updating a local branch from its upstream
Once my remotes are up to date thanks to the git fetch command, I can locally
update my branches. If the local branch is simply behind its upstream, I can
fast-forward merge the upstream into the local one:
git merge --ff
However, if my local branch contains some commits that are not yet in the upstream branch, it is not possible to do a fast-forward merge as the branches diverge:
                    A ← B ← C ← D ← upstream/develop
                              ↖
                                E ← develop
I do not want either to add a merge commit, since conceptually my local branch and its upstream are the “same” branch. What I want instead is to replay my changes on top of the upstream, to achieve a linear history:
                            upstream/develop
                                  ↓
                      A ← B ← C ← D ← E′ ← develop
To do so, I can simply rebase the local branch on top of its upstream:
git rebase
In fact, even in the fast-forward case, we can use git rebase. To avoid making
too much decisions, it is considered a good practice to always fetch then rebase
when we want to update a local branch from its upstream. We can even configure
git pull to use rebase instead of merge by default, by adding to our
~/.gitconfig:
[pull]
    rebase = "merges"
By doing this, git pull is now equivalent to:
git fetch
git rebase --rebase-merges
The --rebase-merges preserves any merge commit we would have in our local
branch, which is not very common, but still interesting to keep.
Updating an upstream branch
The easiest way to updade an upstream branch, when it is behind the local branch, is to run:
git push
However, if the branches have diverged, git replies with an error:
To path/to/remote.git
 ! [rejected]        main -> main (non-fast-forward)
error: failed to push some refs to 'path/to/remote.git'
hint: Updates were rejected because the tip of your current branch is behind
hint: its remote counterpart. Integrate the remote changes (e.g.
hint: 'git pull ...') before pushing again.
hint: See the 'Note about fast-forwards' in 'git push --help' for details.
There a two reasons for a divergence:
- someone else has pushed some commits to the upstream, and we have unpushed commits on our side;
- we have rewritten the history of our local branch—for instance by doing a rebase.
In the case someone else has pushed commits, we first need to integrate them in our local branch, as we’ve seen in Updating a local branch from its upstream:
# Update our references of remote branches.
git fetch
# Rebase our changes on top of the remote changes.
git rebase
# Now that the divergence has been resolved, push our changes.
git push
If we have rewritten the history, then we need to rewrite the history of the
upstream branch as well. To achieve so, we should use the --force-with-lease
option:
git push --force-with-lease
As this is a bit long to type, I use instead gpf as an alias.
Now, you may ask why I am not using the --force option, that can be shortened
to -f. Short answer: it is dangerous.
Long answer: imagine we have rewritten the history on our local branch, and are ready to force push. But in the meantime, someone else has pushed some new commits to the remote as well. This gives us a history like this:
                          C ← D ← E <- origin/some-branch
                       ↙
                  A ← B ← C′ ← D′ <- some-branch
Originally, both branches had commits A, B, C and D. Locally, we have rewritten
C and D which are now C′ and D′. On the remote, someone has pushed a new commit
E. If we do a git push -f we would replace the state of the remote with our
local state, hence loosing the new commit E, which we want to keep.
This is what --force-with-lease is meant to avoid. If we do a git push --force-with-lease, it sends to the remote our last known state of
origin/some-branch. If it does not match, the remote refuses our push.
However, whenever we do a git fetch, we update this known state. Consequently,
if we do a git fetch without checking if there are any new commits, then run
git push --force-with-lease, we still loose the commit E. So beware!
As a rule of thumb: never force push to a shared branch. We can do whatever we want to with our own branches, but if someone else has the right to push to the branch: do not force push. Except if everyone is aware of the change and immediately update their branch, as we’ll see in the next section.
Handling a force-pushed remote
When we do a git fetch, we can see how the remote references are updated:
remote: Enumerating objects: 4, done.
remote: Counting objects: 100% (4/4), done.
remote: Compressing objects: 100% (2/2), done.
remote: Total 3 (delta 0), reused 0 (delta 0), pack-reused 0
Unpacking objects: 100% (3/3), 907 bytes | 907.00 KiB/s, done.
From ../remote
 + 67234e9...f9be508 main       -> origin/main  (forced update)
Here we can see that origin/main has been forcibly updated. In this case, we
simply need to do:
git rebase
It will work happily whether we had other local commits or not.
Handling multiple remotes
The GitHub workflow
When working on an open source project hosted on a forge like GitHub, we usually don’t push directly to the project’s repository. Instead, we create a fork, push to our fork, and open a Pull Request to merge our branch into the main repository. In this case, I usually have two remotes in my local repository:
originpoints to my fork, where I push the code I want to contribute before to open a Pull Request,upstreampoints to the official repo of the project on the forge.
This allows me to rebase a branch on top of upstream/develop for instance.
I then consider three kinds of branches in my mental model:
- “upstream” branches, like
mainordevelop, which are present inupstream, maybeoriginand maybe locally, - my public branches, which are present in
originand locally, - my private branches, present only locally.
I tend to keep my fork clean, so that it contains only my public branches and
upstream branches I am based on—generally either main or develop, depending
on the workflow of the project.
When I start contributing on a project, I:
-
fork the repository in the forge and cleanup unneeded branches,
-
clone my fork:
git clone https://forge.net/me/project.git -
add an
upstreamremote:git remote add upstream https://forge.net/project/project.git
One interesting feature of Git is its ability to separate push and pull / merge behaviours. As I will always push to my fork, I can ensure this is the default push branch by running:
git config remote.pushDefault origin
The upstream of a branch, however, can be configured to any remote. Going back to my three kinds of branches, I get:
- “upstream” branches should have their upstream set to
upstream, - my public branches should have their upstream set to
origin, - local-only branches, quite obviously, don’t have an upstream.
On a fresh clone from origin, even “upstream” branches have their upstream set
to origin. I can switch their upstream by running:
git branch -u upstream/main main
git branch -u upstream/develop develop
It is now possible to update an upstream branch in my fork by running:
git switch main
# This will pull from `upstream`, as its upstream is `upstream/main`.
git pull
# This will push to `origin`, as we have configured it as the push default.
git push
Configuration
Before to conclude, let me share the configuration I am using for Git and its command line. Any suggestion from your own experience is welcome.
Git Config
Here is my full ~/.config/git/config:
[alias]
    fixup = "!git log -n 50 --pretty=format:'%h %s' --no-merges | fzf | cut -c -7 | xargs -o git commit --fixup"

[commit]
    gpgSign = true

[credential]
    helper = "git-credential-libsecret"

[gitflow "feature.finish"]
    no-ff = true

[gitflow "hotfix.finish"]
    sign = true

[gitflow "release.finish"]
    sign = true

[gpg]
    program = "gpg2"

[init]
    defaultBranch = "main"

[merge]
    ff = false

[mergetool]
    keepBackup = false

[pull]
    rebase = "merges"

[push]
    autoSetupRemote = true

[rebase]
    autosquash = true

[tag]
    gpgSign = true

[user]
    email = "<my-email>"
    name = "<my-name>"
    signingKey = "<my-gpgkey-fingerprint>"
Aliases
As I mostly use Git from the command line, it would be annoying to type the full
commands all day long. Thus, I use many aliases to make my life easier. Most of
them are from the git plugin of Oh My
Zsh. As there are quite some, I will not
copy them here, but you can check the git plugin
README.
In addition to the ones defined by Oh My Zsh, I (re)define the following ones:
alias gi='git init'
alias glgs='glg --show-signature'
alias glol="git log --graph --pretty=format:'%Cgreen%G?%Creset %C(yellow)%h%Creset - %s%C(auto)%d%Creset %Cgreen(%cr) %C(bold blue)<%an>%Creset' --abbrev-commit"
alias glola='glol --all'
alias gbv='git branch -vv'
alias gba='git branch -avv'
alias gfa='git fetch --all --prune --tag'
alias gmff='git merge --ff-only'
alias grbp='git rebase -p'
alias gfx='git fixup'
alias gwl='git worktree list'
alias gwa='git worktree add'
alias gwr='git worktree remove'
alias gwm='git worktree move'
alias gsa='git submodule add'
alias gli='git clean -dxn -e ".direnv/" -e "/config/"'
alias gclean='git clean -idx -e ".direnv/" -e "/config/"'
Wrapping up
Wow, it’s been quite a long journey! I hope you’re still doing well after this full load of information. Before we get back to our day-to-day activities, let’s review what we’ve gone through:
- Git is a distributed version control system,
- Git maintains a local image of remote repositories,
- the entire history is copied on every machine,
- branches are like pointers to commits: easy to crate and move,
- branches can be used to separate the work in independent threads,
- git-flow is one of the ways to organise branches,
- worktrees allow to work on several topics without switching branches all the time,
- commit messages are like telling a story,
- Conventional Commits helps to standardise commit messages,
- interactive rebase helps to craft a readable history.
ℹ️ Then, merge or rebase?
As a rule of thumb, if we have two distinct branches: merge. If we are trying to get a branch and its upstream aligned: rebase.
If you have any remark or just want to get in touch, you can send me an email.
References
- Pro Git by Scott Chacon and Ben Straub
- A successful Git branching model by Vincent Driessen
- Conventional Commits
- Organise your commits by Nick Cameron
- Contributing to a project in Pro Git by Scott Chacon and Ben Straub
- Fixing commits with git commit --fiup and git rebase --autosquash by Jordan Elver
- When should I use "git push --force-if-includes" on StackOverflow